The items you will need are
1 a aluminum soda or beer can
1 pocketknife.

Step 1.
Stand the can up and score a heavy line around the perimeter of the can. (Figure 1.) About 1inch from the bottom. Once you are done with that flip the can over and score two more lines around the perimeter of the can-- a light one about ¼ inch up and a heavy one 1 ½ inches up. When you are done the can should look like the can in (figure 2.) The easiest way to make the lines is to hold the knife stationary as you rotate the can
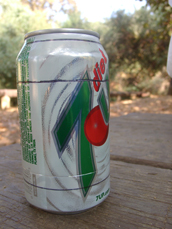
Note: the lines on the can in the picture were made with a marker for ease of illustration. When out in the field I just score a line around the perimeter with the tip of the pocketknife.
Step 2.
Take the tip of your pocketknife and very carefully and easily punch small slits around the perimeter of the can on the line that is about a ¼ inch from the top of the can. The slits should be about a 1/8-inch long and spaced about a 1/8 inch apart as in (figure 3.)

Step 3.
Take the tip of your pocketknife and score a line around the groove that is just inside the lip of the top of the can. You may have to go around the can a few times in order to score a good line. Once you have scored the line, start to tap at one point where the grove meets the lid. You will find that the lid starts to break off very cleanly on the scored line. (Figure 4.) Continue breaking the lid at the score until the lid has fallen in the can.

Step 4.
Take the tip of your pocketknife and make a slit along the score that is 1 inch from the bottom of the can. Once you have done that you will notice that with a little gentle pressure the can will easily start to tear very cleanly around the score. (Figure 5.) Once you have neatly cut off the bottom of the can, neatly do the same thing along the score that is 1-½ inches from the top of the can. When you are done with that. You should be left with three pieces the bottom portion the middle portion and the top portion. Take the middle portion and cut it open from top to bottom so you can open it up.
If you have done everything correctly you should end up with three pieces as in (figure 6).


Step 5.
Take the center piece spread it open (you may have to hold it open with something.) and cut off a strip along the long edge that is about 3/8 inches taller in height than the top portion of the can. Try to make sure the edge is as straight as possible when you cut it. so in this case if the top portion of the can is 1 1/2 inches tall then the strip you cut should be about 1 7/8 inches tall (a little more than 1 3/4 inches tall) and the length should be about 8 1/2 inches long (the length of the strip from a standard soda can)
Step 6.
Once you are done take the top part of the can (the one with the small slits) and flip it over. You will notice a small gap that runs around the inside of the lip of the can. (Figure 7.) Take the strip that you just finished cutting and insert it so that it slides into and around the gap. You will find the ends from the strip overlap each other. That’s ok. What you do is along the edges in the middle of where the ends over lap is cut two small slits about 3/16 of an inch long and 3/16 of an inch apart—make sure you cut through both overlapping edges— and fold the newly formed tab back (this will hold the ends together). (Figure 8.) Continue by making three more evenly spaced tabs around the edge of the strip. These taps will serve as flow points for the alcohol once the stove is complete (Figure 9.)


Step 7.
Take the bottom piece of the can and start to ruffle the perimeter of the can with your thumb. (Figure 10.) You don’t want creases, just ruffles. These ruffles are to allow the top portion of the can to fit over the bottom portion easily.
Step 8.
Take the top portion with the strip intact, and slide it over the bottom portion of the can. The key here is to do it nice and easy. Making sure that the two portions are joining evenly. You will notice if you look on the inside of the bottom portion of the can there is a groove. What you want to do is to make sure the edge of the rolled up strip with tabs, fits into the groove. You will find that if you twist the cans together gently, the strip will find its way into the groove. Make sure you do not squeeze the pieces together to tightly. You just want the edge of the strip to sit in the bottom of the groove.
At last, if everything was done correctly you should have a stove that looks like the one in (figure 11.) All you do now is pour a little alcohol in the center, light it and your ready to go. But before we do that a few key points to remember:
· Isopropyl alcohol works well with the stove but it does not burn as clean as denatured.
· You will notice the aluminum strip creates an inner wall to the stove. That is to create a vapor chamber and force the gas out of the jets. Believe me, with out that second wall, the jets would not work.
· You can set your cooking pot right on top of the stove and cook. However, the stove is not as sturdy and may tip over easily. Caution should be maintained.
· Although, no amount of blowing will extinguish the flame. It is recommended to use a windscreen for proper function. I wrap aluminum foil around three sticks pegged into the ground.
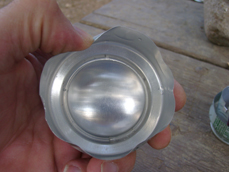

figure 11
source

0 komentar:
Post a Comment